Followers
Wednesday, December 16, 2009

A nice young lady asked me to help her make a Blog Button, so I thought this would be a good learning lesson!
What we are going to do is use the image that I have created here to the left and turn it into a clickable button in a text box do that people can grab your button to put on their blog
First create the image, and upload it to a Blogger post, click the box for "No Layout" before you upload it. Save the post as a draft.
That will be the image that sits on your blog (Your personal image doesn't need to be clickable because it resides on the place that they are going to click to) so we won't add the blog link to yours.
To make a clickable image in the text box that you put below your personal image so that people can grab the code. Follow these steps:
We will be using the code for this blog's button for our example!
Take the image code, remove the blogger address (code highlighted in grey) that is in the first set of brackets You will keep the code that starts with <img...
<a href="https://blogger.googleusercontent.com/img/b/R29vZ2xl/AVvXsEiKdYkaG4oIvSN5oeqPw7TVAHdgYOyhqArfokYDsP8kctZNEHffzbr2mUexmFj9sQFeSViIl0SuTQ3-kluMJAELdT4_6-MZ6JtdLtpPg8gakNlSB0krUqV34EQLkWYs_VT_OTcJ/s1600-h/Blogbutton.jpg"><img style="cursor:pointer; cursor:hand;width: 186px; height: 126px;" src="https://blogger.googleusercontent.com/img/b/R29vZ2xl/AVvXsEiKdYkaG4oIvSN5oeqPw7TVAHdgYOyhqArfokYDsP8kctZNEHffzbr2mUexmFj9sQFeSViIl0SuTQ3-kluMJAELdT4_6-MZ6JtdLtpPg8gakNlSB0krUqV34EQLkWYs_VT_OTcJ/s320/Blogbutton.jpg" border="0" alt=""id="BLOGGER_PHOTO_ID_5415908285347859266" /></a>
In front of that code you will add the link for the place that you want it to click to...written in this format: <a href="URL of Blog"> (Added in the grey highlighted code).
<a href="http://howcanidothat.blogspot.com/"><img style="cursor:pointer; cursor:hand;width: 186px; height: 126px;" src="https://blogger.googleusercontent.com/img/b/R29vZ2xl/AVvXsEiKdYkaG4oIvSN5oeqPw7TVAHdgYOyhqArfokYDsP8kctZNEHffzbr2mUexmFj9sQFeSViIl0SuTQ3-kluMJAELdT4_6-MZ6JtdLtpPg8gakNlSB0krUqV34EQLkWYs_VT_OTcJ/s320/Blogbutton.jpg" border="0" alt=""id="BLOGGER_PHOTO_ID_5415908285347859266" /></a>
Then wrap that whole piece of code in a textarea box, using <textarea name="HTML for Picture" rows="4" cols="20"> at the beginning....and </textarea> at the end.
<textarea name="HTML for Picture" rows="4" cols="20"><a href="http://howcanidothat.blogspot.com/"><img style="cursor:pointer; cursor:hand;width: 186px; height: 126px;" src="https://blogger.googleusercontent.com/img/b/R29vZ2xl/AVvXsEiKdYkaG4oIvSN5oeqPw7TVAHdgYOyhqArfokYDsP8kctZNEHffzbr2mUexmFj9sQFeSViIl0SuTQ3-kluMJAELdT4_6-MZ6JtdLtpPg8gakNlSB0krUqV34EQLkWYs_VT_OTcJ/s320/Blogbutton.jpg" border="0" alt=""id="BLOGGER_PHOTO_ID_5415908285347859266" /></a></textarea>
The rows...and columns (cols) can be changed to change the height and width of the box.
Then take the original code that you got when you uploaded the image, and add the textarea box underneath it, and viola! It comes out looking like this on your blog:


Monday, September 28, 2009
by Bonnie Calhoun
Hi guys and gals! It's been a while since I had something new to teach you! But I just helped a gentleman with this last night so I thought I'd pass on the info.
What we're going to learn today is how to customize a table to work in Blogger, and all the cool things you can do with it.
This particular table that I'm going to show you how to make has three columns (that go across) and five rows (that go down) on the page.
| Day | Food | Child |
| Monday | Hot Dogs | Mike |
| Tuesday | Chicken | Mary |
| Wednesday | Hamburger | Paul |
That is what it will look like, and this is the code that you copy to create it!
<style type="text/css">.nobrtable br { display: none }</style>
<div class="nobrtable">
<table style="text-align: left; width: 460px;" border="1" cellpadding="2" cellspacing="2">
<tbody>
<tr>
<td>Day</td>
<td>Food</td>
<td>Child</td>
</tr>
<tr>
<td></td>
<td></td>
<td></td>
</tr>
<tr>
<td>Monday</td>
<td>Hot Dogs</td>
<td>Mike</td>
</tr>
<tr>
<td>Tuesday</td>
<td>Chicken</td>
<td>Mary</td>
</tr>
<tr>
<td>Wednesday</td>
<td>Hamburger</td>
<td>Paul</td>
</tr>
</tbody>
</table>
</div>
Now! What you can do to add customization:
If you want more columns(across) across the table, add more table data units, like this. Note: You must add the same amount to each row!
<tr>
<td></td>
<td></td>
<td></td>
<td></td> .....notice extra td unit!
</tr>
If you want more rows (going down the page. Add more table rows (tr).
<tr>....this is the beginning of a tr unit
<td></td>
<td></td>
<td></td>
<td></td>
</tr>.....this is the end of a tr unit
If you want the table to be wider or narrower, change the pixel number in the width unit:
width: 460px
If you don't want a border, turn the border number to zero:
border="0"
Note: the higher the border number, the thicker the border.
And the cellspacing numbers tell you how many pixels between the cells of the table, while the cellpadding tells you how many pixels between the sides of the cell and the writing that you put in it!
cellpadding="2" cellspacing="2">
Have at it, and have fun!!

Friday, January 23, 2009
by Bonnie Calhoun
Hi folks! Another tip has been pulled to the forefront of my memory by an inquiring blogger...the necessity of using target="_blank".
LOL...don't look at me like that...I'm not talking dirty :-) Using target="_blank" in an outgoing link on your blog or website causes a new browser window to open when the link is clicked. It is desirable for two reasons.
First, the visitor is still on your website when they close that window after perusing, and they don't have to navigate back to your page.
And second, it helps to decrease your "bounce" rate.
LOL...I knew I'd get your eyes to roll up in your head at least once in this post :-)
Bounce Rate is defined as how many times a visitor "bounces" away from your site and comes back. If you are involved in increasing your SEO (Search Engine Optimization), the bounce rate on an entry page can help to determine how effective it is at grabbing people's attention.
Now before you running screaming from the room yelling, "SEO, SEO!" I must add caviar...LOL...I mean...a caveat. Bounce rate is only an SEO factor is you have a site for commerce. If your site is about ordinary stuff like blogging, news or just plain information you really don't have to worry.
The neat and conclusive reason for adding target="_blank" is to keep people on your page!
Write your links like this:

Tuesday, January 20, 2009
by Bonnie Calhoun
Man, oh man! I'm just full of posts lately! *snort-giggle* I've been helping a lot of friends get their blogs redesigned.
Well here is a problem I've noticed on several of my friends blogs. When they re-install their templates, they can no longer get their header images to show. Well I've come up with a work-around....LOL...and yes...you have to go play with your HTML!
I'll turn ya'll into template gurus yet!
This problem is especially prevalent on the Scribe template. When you switch templates the Header gadget should stay, but in the Scribe it doesn't...so go figure!
Here's how we're gonna fix it. We're going to delete the present Header element from the template and add a new one. LOL...I think the old one has a bad case of the ick! But first we have to allow the Header section to allow another gadget (You will notice that there is no "Add a Gadget" section on the Scribe Header.
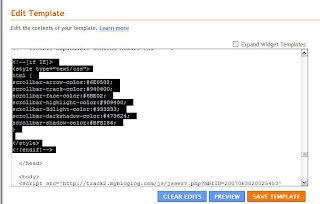
Here's where we go play with HTML. Start at your Dashboard....go to the Layout tab...then click the Edit HTML link. We are going to scroll down to the highlighted section of code in the below image. If you can't read what it says, click on the image and it will open in a larger window.
What you are going to do is change the line where it says...showaddelement "no"...to "yes" This will allow the "add a Gadget to show up in the header section of your template. And you are going to remove the <b section that has your bad Header, so that that section looks like this when you are done.
Now you will click "Save Template". It will tell you that you are deleting a Widget, like in the below image. That's okay...click yes!
Now go to your Page Elements page...see the "Add a Gadget" in the Header section. Click it! Scroll all the way to the bottom of the list and pick Page Header.
When it opens, click for the image to show "instead of the title and description" Then either find your image on the internet at your storage site, or use the top link and upload it from your computer. Then click save! Viola! You have your header back!

Sunday, January 18, 2009
by Bonnie Calhoun
Hi guys and gals! Yes it's me again...twice in one week! Well I'm helping some friends spiff up their blogs, and I've had to re-remember stuff I've done in the past. Okay...today we're going to add color to that pesky browser scroll bar.
Now before you use this code, I must make you aware that it will not work in Firefox...LOL...they don't like people messing with their colors, so you can only get this to work in Internet Explorer.
The last caveat that I add to it is that, if you're anal retentive like I am about making my web pages validate this one is going to throw you for a loop because according to W3C...it ain't valid! So you will get an error code for it, but it won't break your page or anything...LOL...unless you have like 5000 other errors!
Okay...here's what you use:
<!--[if IE]>
<style type="text/css">
html {
scrollbar-arrow-color:#6E0502;
scrollbar-track-color:#940400;
scrollbar-face-color:#6BE02;
scrollbar-highlight-color:#909400;
scrollbar-3dlight-color:#333333;
scrollbar-darkshadow-color:#473624;
scrollbar-shadow-color:#BFB186;
}
</style>
<![endif]-->
And you scroll down til you get to the end of the <head> section, and you put it right BEFORE the </head>
Viola! You've got a color coordinated browser scrollbar!

Monday, January 12, 2009
by Bonnie Calhoun
One of my friends ask me to help her create a scroll bar for her rather long link list. So I thought I'd share the result with you.
It's rather easy to accomplish. As with everything I tell you, make sure you have saved a copy of your template in NotePad before you go farting around with it. And when you add code to your HTML, please....use the "Preview" button to see if that is what you want. If it is not, hit the "Discard Edits" button and you will be back where you started from.
Only hit SAVE...when you are sure you have the proper results!
Okay...now for the easy part...go to your LAYOUT tab. Click Edit HTML. Scroll down in the code until you see:
/* Sidebar Content
----------------------------------------------- */
/* Sidebar Content */
Right below that add:
#LinkList1 {
height:150px;
overflow:auto;
}
The number '150' in the height tells you how tall the box will be before it show the scrollbar, (illustrated to the left) you can change that number at will!
If you only have one link list in your sidebar, this will work as written. But if you add more than one scroll bar you will have to scroll down in your HTML is see what the list is called to create a scrollbar for it. Typically the default names will be LinkList1, LinkList2...and so on. Change the name in the piece of code that you add according to that name that the widget gives it.
And add the piece of code for each list that you want to have a scrollbar!
One other NOTE...your sidebar section in your HTML might not be names exactly the same as mine...it might just say:
*/Sidebar/*
or
/* Typography :: Sidebar
----------------------------------------------- */
Whatever it says, it's just a section name, and I want you to put it in the right section...LOL...only because I'm a neat-freak, and anal-retentive about how the code is organized! *snort-giggle* You could actually put it in any section...but you might forget where you put it...So keep it neat!
Happy blogging! Till next time!


